
Our favourite places to stay on this sleepy Cebu island.
How I Got My Australian Visitor Visa Online in 5 Simple Steps
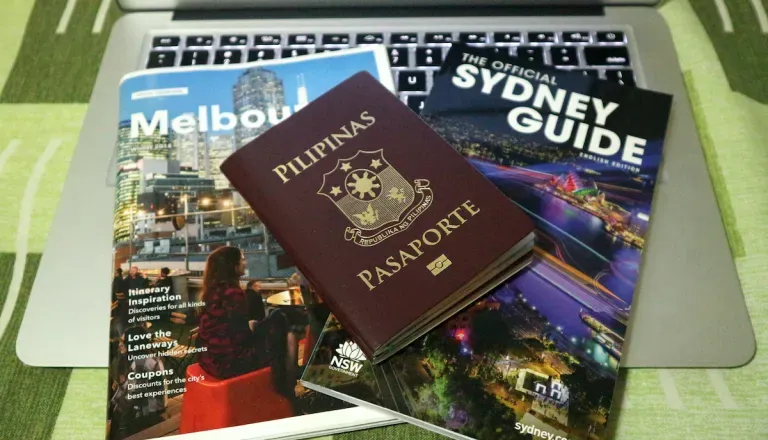
Last June 2018, I applied for an Australian Visitor Visa online, and I must say that it’s one of the easiest to get for Filipinos. I used our existing Australian Visa Guide as a reference but let me try to simplify the entire process based on my experience.
Also read: Easiest to Hardest Visa Applications According to Filipino Travellers
Here’s an open secret: one of my travel buddies got denied on his first attempt, so I’ll give you some tips on how to avoid the same predicament. Read on.
Step 1: Create an ImmiAccount
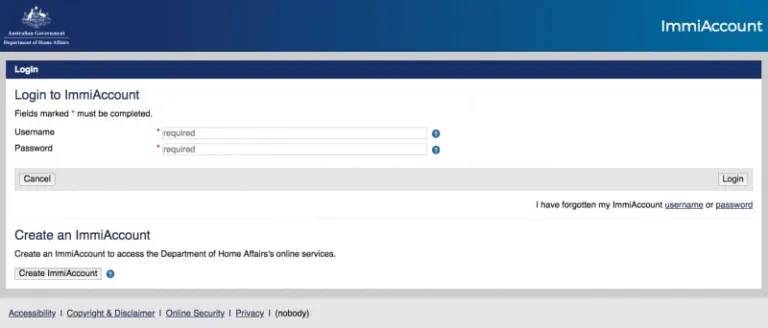
Visit this ImmiAccount portal and click “Create ImmiAccount”. You will be redirected to a page where you need to input your personal information including your name, contact details, and valid email address. On the next page, you will be asked for your login details (username and password) and secret questions, and you’ll have to agree to the site’s terms and conditions. Click submit and wait for an email verification.
Tip: Make sure you give a valid email because everything will be communicated via this email, including your final Visa Grant Notice.
Step 2: Login to your ImmiAccount and create an application
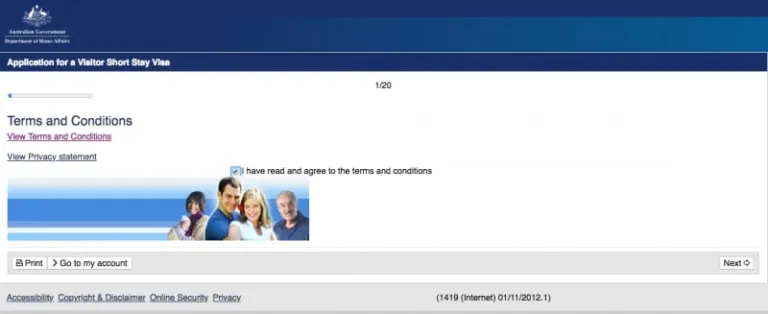
Log in to your ImmiAccount and create your application. You will be asked to select your Visa type. Choose Visitor Visa (600) if you’re travelling to Australia for a short period (not more than one year). There are basically 20 pages for you to go through, but you don’t have to finish everything in one sitting. Just answer the questions or provide the required details and click the “Next” button if you want to continue, and “Save” if you want to complete it at a later time.
Tip: It took me three days to complete this form, so I advise that you take your time and double check every single entry before you finally click “Submit”. One error or inconsistency could be grounds for visa denial.
Step 3: Attach the documents

After going through all the pages, you will have to attach your documents to prove your personal identity and travel capacity. You can attach a maximum of 60 documents. To know more about attaching documents in your ImmiAccount, please read this.
Here are the scanned documents I attached for your reference:
- Photograph – Passport: Passport Size Photo (front, and back with signature)
- Travel Document: Passport Bio Page
- Family register and composition form: NSO Birth Certificate
- Evidence of the applicant’s previous travel: Old Visas and Entry/Exit Stamps
- Evidence of current employment or self-employment: Employment Certificate with Approved Leaves
- Evidence of the financial status and funding for visit: Bank Statement and Bank Certificate
- Evidence of planned tourism activities in Australia: Daily Itinerary and Flight Tickets
Tip: Since I don’t have a scanner at home, I used CamScanner app to scan and crop my documents. Install it on your mobile phone or tablet and scan away. It’s free and user-friendly.
Step 4: Pay the online visa application fee

After attaching all the documents, submit and pay your visa application fee. You may pay through PayPal or via credit card. Visa fees may change from time to time, but when I applied, I paid ₱5,776.15 (AU$141.37) including credit card charges. Check the current Australian visa fees here. After paying, you will receive an acknowledgement email that your application has been received.
Step 5: Wait for your visa

The most excruciating part of every visa application — waiting time! Keep calm and don’t worry so much if you have submitted all the needed documents. I got my multiple-entry Visitor Visa (subclass 600) after five working days. This may vary from 48 hours to more than 20 working days. To know the updated visa process times, click here.
Breakdown of my visa expenses
Online visa application fee = ₱5,776.15 (AU$141.37)
Bank certificate / statements = ₱100
Passport photo = ₱150
Total = ₱6,026.15
Tips to increase chances of visa approval
If you’ve reached the bottom of this article, then you must be really interested in applying for an Australian Visitor Visa yourself. As mentioned earlier, my friend got denied on his first application, but he applied immediately after updating his documents. There’s no holding period or limit for re-application so if you get denied, revisit your application, correct any possible mistake, and apply again! Here are some more tips for you:
- Submit certified true copies of your documents. If you think that your documents look a little questionable, it’s best that you get them certified by a notary public before scanning and submitting them online. My friend submitted a dubious looking payslip, and we think it was a major factor in his visa denial.
- Submit flight tickets and hotel reservations. They are not required, but they should help support your capacity to travel and your intent to return to the Philippines. My friend didn’t attach these, FYI.
- Ask the bank for printed copies of your bank statements. Do not submit downloaded copies of your online bank statements just like what my friend did. Different banks charge different fees for this request so go to your bank and ask for it!
- Attach all your travel history evidence. This includes old visas, eVisas, and passport stamps of your old and new passport.
- Create a cover letter. This is not required, but if you feel that your documents and your employment status need further explaining, you need to submit a cover letter expounding your situation.
- Indicate your group name if travelling as a group. In one of the 20 pages in Step 2, you will be asked if you are travelling with someone or with a group of people. If you are, this may be to your advantage. You could actually assign a name for your group, list down its “members”, and ask your travel buddies to input the same group name when they apply for their visas individually. That way, the Australian embassy will be able to tell who you’re travelling with, and crosscheck this information with your friends’ applications, too.
That’s basically it! Still have questions in mind? Read our 13 frequently asked questions on Australian tourist visa for Filipinos and see if your concerns are already there. Good luck with your own Australian visitor visa online application!
Disclaimer: Although I was granted a multiple-entry Visitor Visa to Australia, this doesn’t mean that I’m already a visa expert here. It is still best to refer to the Australian Government Department of Home Affairs for your personal queries and concerns.
Published at
About Author
Charmaine Acha
Author at TripZilla
Subscribe our Newsletter
Get our weekly tips and travel news!
Recommended Articles
10 Bantayan Island Resorts, Hotels, and Rentals for Your Tropical Escape 14 Best Credit Cards for Travel in the Philippines The only plastic we need for travel.
10 Best Mountain Cafes in the Philippines for Your Peak Coffee Experience Coffee date on the mountains, anyone?
10 Family Outing Ideas in Metro Manila Under ₱500 Looking for a weekend bonding with the family under ₱500? Head to these places, pronto!
Top 10 Post-Breakup Destinations for Healing and Self-Rediscovery Ready for a solo travel?
Latest Articles
Every Disneyland Park You Can Visit Worldwide Where Disney magic lives
Guide to Palawan Delicacies: 9 Authentic Must-Eats and Pasalubong Taste your way to Palawan!
Canada Expands Visa-Free Travel to the Philippines: Here’s What You Need to Know Filipinos can now travel to Canada visa-free!
First American Pope Elected: Meet Pope Leo XIV Historic Vatican moment unfolds
Limasawa Island: Beaches, History, and Hidden Gems Where history and island life meet