
Cheers to a whopping number of 20 holidays and 13 long weekends in the Philippines! Filipinos have all reasons to rejoice this 2015 as well! Feeling the vacation vibe? Plan your getaways now!

How to Apply for a US Tourist Visa for Philippine Passport Holders

So you dream of travelling to the USA. You aren’t alone. In fact, there was a research in 2014 that showed that Filipinos adore the USA even more than Americans do. The country has a lot of things to fascinate Filipinos — the different seasons, the sights to see, the independent culture, the star-studded cities, and a taste of the American Dream.
Unfortunately, most of us know how difficult it is to get a US Tourist Visa. Still, you should never lose hope. The good news is, the Internet has made it easier for aspiring travellers to apply for it, and here’s the simple step-by-step process.
Also read: Easiest to Hardest Visa Applications According to Filipino Travellers
Step 1: Pay the visa application fee

For a US Tourist Visa, you will have to pay a non-refundable, non-transferable fee of US$160. Payment is expected to be in local currency.
If you have an account with BPI or BancNet, you can conveniently pay online. Just take note of your reference number here for BPI users or here for BancNet users. Enroll the US visa for your online bill payment. A step-by-step guide on how to do that can be found here for BPI users and here for BancNet users. After payment, you’ll receive an email confirmation of your transaction. Print it out as this will serve as your receipt for the interview.
You can also opt for an over-the-counter transaction at any BPI branch. Simply print the document found here and present it to a BPI bank teller. Keep the receipt of your transaction for the interview.
Note: You’ll need the UID/receipt number for each visa application fee. If you’re paying for more than one visa application, pay the fees separately.
Step 2: Complete the nonimmigrant visa application form
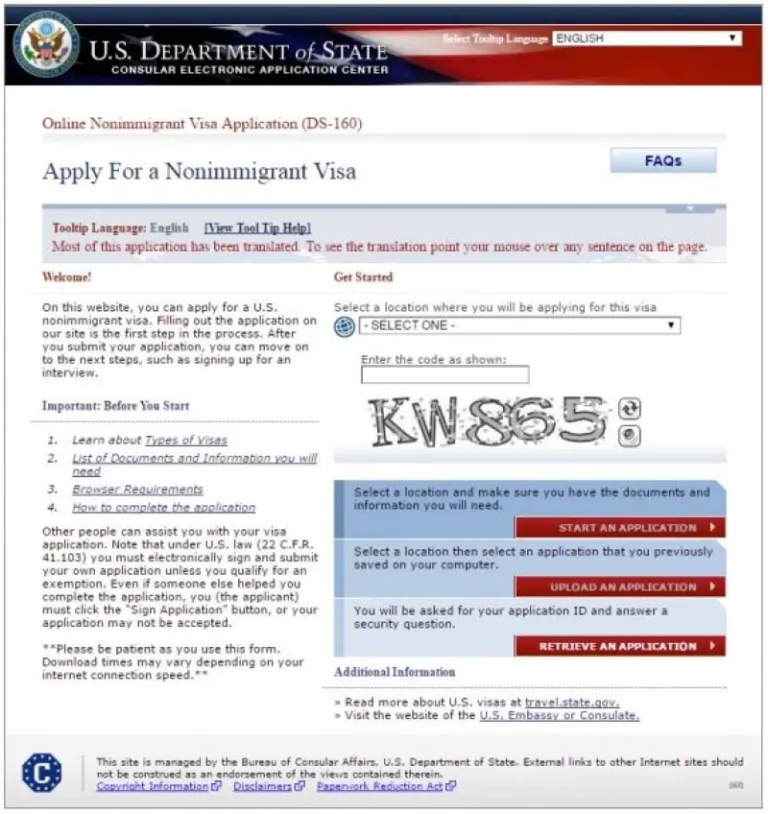
Access the DS-160 form in the Consular Electronic Application Center website. Click Start an Application and take note of your application ID. Accomplish the form truthfully and leave nothing out.
Note: Double check all your answers to make sure you answered everything accurately. You won’t be able to edit this after you’ve clicked the submit button. Also, remember all your answers as these will be the basis for the interview questions.
Step 3: Schedule your appointment
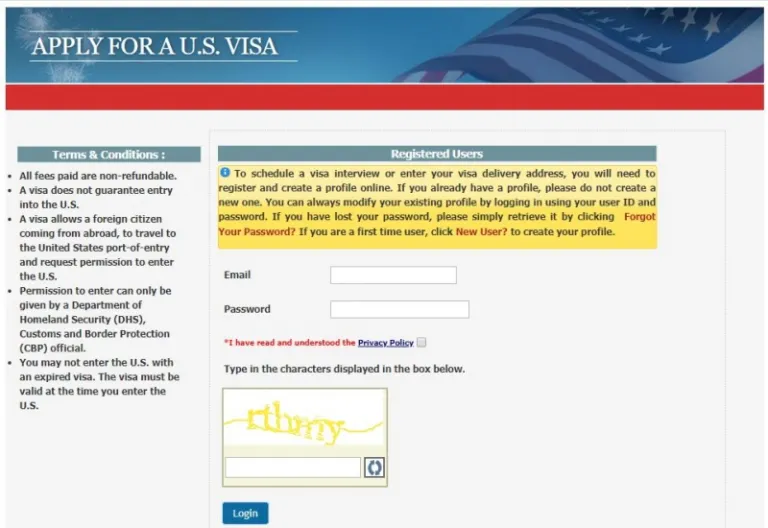
Go to the Bureau of Consular Affairs website. If it’s your first time on the page, simply register your information.
- On the sidebar, click New Application/Schedule Appointment.
- Click Nonimmigrant visa > Business/Tourism > B1/B2.
- Fill out your personal data.
- Book an appointment.
Step 4: Prepare the requirements

While waiting for the interview, prepare the documents you need to bring to the US Embassy: a printed copy of your appointment letter, DS-160 confirmation page, a passport valid for another six months, a recent 2×2 photo, and the visa fee payment receipt.
If you have other supporting documents that you think will help you secure a US visa, then prepare them just to be sure. As much as possible, bring original documents rather than photocopies. Some supporting documents include proof of income, tax payments, your travel itinerary, a letter from your employer, and pay slips. You can find other supporting documents here.
Step 5: Kill the interview

Arrive several minutes earlier than your scheduled time for the interview. Look for the signage of your interview time and fall in line. Be sure to have all your documents neatly arranged and accessible as you will need to present them during security check. Right after the interview, you’ll know whether your US Tourist Visa is approved or denied.
Tip: Dress to impress. You don’t have to walk in wearing a ballgown, but make sure your first impression will show that you’re serious in applying for a Visa. Stay calm throughout the interview. Be polite and absolutely honest with your interviewer.
Also read: Inspiring Visa Denial-Turned-Approval Stories of Filipino Travellers
Even when the application process itself shouldn’t last for more than a week, you might need more time to process other requirements. So, it’s safe that you apply for a US tourist visa three months in advance.
Congratulations, you now know the simple steps in applying for a US Tourist Visa. Good luck!
Published at
About Author
Danielle Uy
If Disney were creative enough to let Mulan and Melody procreate, Danielle would be that child. From an early age, she has dreamt of becoming a purposeful revolutionary... and an unruly mermaid. While Danielle hasn't held a sword in her lifetime, she feels powerful enough with her byline. Her creative energy is fueled by many things: the quiet right before the rest of the world wakes up, the orange sky as the sun rises during an uncrowded morning surf, the beautiful bitter taste of black coffee, and the threatening reminder of a pending deadline.
Subscribe our Newsletter
Get our weekly tips and travel news!
Recommended Articles
13 Long Weekends in the Philippines in 2015 5 Easy Weekend Destinations Outside Manila, Philippines There are many other beautiful places in the Philippines outside its capital, but these 5 destinations will let you enjoy weekend trips with great ease.
9 Long Weekends in the Philippines in 2016 It’s definitely more fun in the Philippines in 2016 as there will be 9 long weekends with 4 days leave! Plan your getaways with our cheatsheet & calendar.
27 Places in Manila for A Completely Free Outing You don’t have to spend a single peso to enjoy Manila because there are many things you can absolutely do for free!
Backpacking Northern Luzon in 9 Days for PHP10,000 9 days, 5 destinations and a budget of Php 10,000, here’s your budget travel guide to backpacking the northern region of the Philippines.
Latest Articles
Viral Airbnb Guest Holds House Blessing at Rental Property, Sparks Online Debate Guest etiquette reminder
Beyond the Classics: A First-Timer's Guide to Exploring Zürich in 5 Days We wanted to experience a little bit of everything during our five days in Zürich!
Japan Has a Bar Called "The Church" and It's Unlike Anything You've Seen Tokyo's viral church bar
France Heatwave Forces Eiffel Tower and Louvre to Adjust Opening Hours Travel plans disrupted
Europe Heat Wave 2026: Countries And Cities Most Affected By Record Breaking Temperatures Travel alerts and updates